 Products & ServicesExperienceWho We AreContact UsRequest More Information
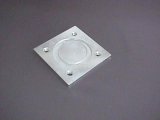
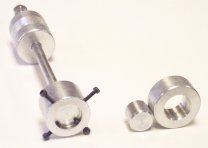
Corvette Tools Application Tools Application Technical Article:U-Joint Replacement the Easy WayAfter reading several articles in some Corvette magazines describing repairs with recommendations to use U-Joints with grease fittings, I just had to write this article. Having replaced many U-Joints over the years in my 65, two 66 Corvettes and others, I designed and made a set of tools that makes this process almost painless. I would like to share some of the un-nice things that can happen when you get it wrong, specifically the damage that can be done by using incorrect U-Joints, not installing them properly, and what happens when they break. Problems with replacing U-Joints: The typical method is to use two sockets one larger and one smaller than the U-Joint bearing cap and press the U-Joint bearing cap out using a bench vise, first pressing out one side of the bearing cap and then pressing out the other side. Sounds simple and it is, but it doesn't work this way with half shafts. The first time I replaced a half shaft U Joint was 30 years ago. This was on my first Corvette, a 66 and it was only 3 years old. The left rear U-Joint was making noise and I could feel the bind during acceleration. I went down to the Chevrolet dealer and purchased some new heavy duty U-Joints and went home to replace all of the U-Joints. The Hard Way: Removing the half-shaft went pretty smoothly, I removed the nutshe nuts holding the "U" bolts to differential, bent out the ears on french locks at wheel side of half shaft, removed 4 bolts, and shoved the top of the wheel outward - the half shaft was now in my hands. After removal of the half shaft the first thing I did was to remove the snap rings and put some penetrating oil on the bearing caps. Get out some cheap sockets from the tool box. With some help I managed to hold the half shaft and two sockets in the vise and press the bearing caps almost through. The cross bottoms out on the yoke. Try as I might I could not get a grip on the bearing cap with a pair of pliers to remove it. I finally put the bearing cap in the vise and beat on the half shaft with a block of wood and a hammer. The second bearing cap was more of a problem, it refused to budge. One more crank of the vise handle and the smaller socket exploded putting socket parts in the shop wall. I got out another cheap socket and fortunately this time the bearing cap was exposed enough, so that it could be pulled out by putting it in the vise. One down and one to go. The first half of the second U-Joint came out of the companion flange without a problem, but when pressing out the second bearing cap on the companion flange, the companion flange deformed, clinching the bearing cap and it refused to budge. I then noticed that the companion flange was bent slightly and now had a small crack in the casting. I called the Chevvrolet dealer the next day and picked up a new companion flange and my wallet was $$ lighter (they now sell for $108 each). I thought to myself "there has to be a better way". Before tackling the next side I decided to make a few tools. The first task was to get rid of the sockets. I made a sketch of the parts and made them the next night. A simple steel donut with a lead to force the bearing cap to go into the hole. Next came the steel plug with a simple lead to make it align with the drive shaft yoke. This solved the broken socket problem. An adapter to clamp onto the bearing cap was made, this attached to a slide hammer from my tool box, and should make removal of the bearing caps a snap. The final problem was the broken companion flange. I sketched up a threaded reinforcement plate and had it made at a local machine shop. It uses the same bolt size and thread that is used on the axle flange. This way I didn't need to keep a spare set of bolts on hand. The Easy Way: I was all set to do the second half-shaft. Removal of the second half shaft went smoothly. After cleaning the bolt threads used to mount the companion flange to the drive axle on the car, I used them to bolt the companion flange to the reinforcement plate. The plug and donut are only one inch thick. This allows a 4" vise to be used to press the U-Joint bearing caps out as far as possible. Some 4 inch vices will not accommodate a pair of sockets and the half shaft. After attaching the puller to the bearing cap, it took two strokes of the slide hammer to pull the cap. The second bearing cap was pressed through until the U-Joint cross bottomed out, the puller was attached to the second bearing cap and a few strokes of the slide hammer and the bearing cap was removed. The reinforcement plate remains bolted to the companion flange because you can just as easily bend and break it during the installation of new U-Joints. The plug is used to press the bearing cap past the yoke's snap ring grove to allow installation of the snap ring. The opposite bearing cap is pressed in to reveal the yoke's snap ring grove and the snap ring installed. One hour later, there were no hammer marks, dents or scratches on the half shaft and everything was straight and tight. Re-assembly with new French locks went without a hitch. Over the years I have loaned or built a number of these tool sets for fellow Corvette owners and they were all grateful for the tools that made this job easy. What Happens When You Get it Wrong: Skip forward to 1992. A friend called me one evening with a tale of woe. He said, "You will never guess what happened to my 67 Coupe". "I broke a U-Joint that I had just replaced and it tore a large hole in my jack well behind the seat, destroyed the strut rod, its bracket, and severely dented the rear cross member and I am just sick - sick - sick - sick". This will make a grown man cry. I went over to his house and looked under his car to inspect the damage. It was pretty bad. He showed me the broken parts of the inboard U-Joint and you could see where the crack started at the top thread for the grease fitting and propagated all the way through the cross. The flailing half shaft caused $2200 of damage to the car before the car could be brought to a stop. Skip forward to 1995. I had just purchased a nice 65 Corvette Coupe from an acquaintance and started a body off restoration. I removed the nice set of leather seats and stored them. The next things to be removed were the door sill plates, console and center pad. I then noticed that the steel panel behind the seats was loose. Out came the carpets, the padding had a hole in it and when the padding was removed from the steel panel you could see why the steel panel was loose. It was mounted with 3 sheet metal screws and had a 3/8 inch thick steel plate welded to the back of it. The alarm bells really went off in my head. I could see the dent in the original steel panel and wondered why anyone would want to armor plate this. When I looked closely at the jack storage well you could see where a 3" wide gash had been ripped from the bottom to the top. This aligned with the inboard U-Joint and the dent in the metal plate. I could only imagine what happened. The driver revved the engine, let out the clutch, and BANG, the next thing he probably did was to go home and change his shorts. The deep dent in the metal panel, the gash in the body, and the inboard U-Joint were all in line with the drivers right rear cheek. The other U-Joints in this car had a grease fitting, the replaced U-Joint did not. When the "65" restoration is finished it will not have any U-Joints with grease fittings. The 67 coupe had a beautiful no-hit body and has a 350 HP 327 with a 4:11 and close ratio 4 speed. The 65 Coupe has a 365 HP 327 with a 3:70 and close ratio 4 speed. The problem only gets worse with a big block car. In addition to weakening the U-Joint the grease "zerks" don't work - typically only one journal will get greased as the grease takes the path of least resistance. If you drive your car NEVER - NEVER use a U-Joint with a grease fitting. ALWAYS use the made in USA heavy duty U-Joint from Chevrolet (GR. 5.548 PN 374246) NEVER use a U-Joint or bearing made in China. The U-Joint tool set is now being produced and sold. The opinions expressed and advice given are the personal opinions of the author. |
Copyright © 2002 MicroControls. All Rights Reserved.